Gross Motor Milestone Series: Jumping

By 24 months of age, 50% of children can jump with both feet off the ground. By 27 months of age, this increases to 75%.jumping Jumping helps to develop leg strength and balance. It requires coordination of upper and lower extremity movements, is used during childhood games, and plays a large role in sports such as basketball and volleyball. Jumping is a building block for more complex  movements, specialized skills, and general physical activity.

Children who lack basic skills, including jumping, often show lower levels of physical fitness as they get older.  Missing skills can make participation in physical activities more difficult and cause kids to avoid them, which can also lead to social isolation from their peers.

While the initiation of activities such as jumping happen spontaneously, these skills need to be practiced in order to be mastered. The most important thing that you can do as a parent to help promote jumping is to give your children the time, space, and opportunity to move.

How To Encourage Jumping

  • Make sure your child is able to step over obstacles without support and without falling.
  • Work on bouncing on soft surfaces, such as a trampoline or a pillow on the floor.
  • Holding both of your child’s hands, help them jump forward or down a few inches. Progress to 1 hand hold assist and then to 1 finger assist and then to no assist.
  • Encourage jumping with both feet leaving the ground at the same time.

What Should Children Do When Jumping?

  • Keep their eyes focused forward or upward throughout the jump
  • Crouch with knees bent and arms behind the body
  • Use a forceful forward and upward swing of the arms
  • Straighten legs in the air
  • Land on the balls of the feet with knees bent to absorb the shock from the landing
  • Control the landing with no more than one step in any direction

Activities To Practice Jumping

  • Cut out shapes, bugs, or letters and practice jumping from shape to shape
  • Blow bubbles and have your child jump up to pop them
  • Place various objects on the ground for your child to jump over. These can include a jump rope, hula hoop, garden hose, sticks, toys, etc.
  • Suspend a ball in the air and have the child jump up and touch it
  • Hopscotch, trampoline, jump rope
  • Jump over (or in) puddles

When To See a Physical Therapist

A physical therapy screen or evaluation might be beneficial if your child is 2½ and still isn’t jumping or is jumping and showing any of the following:

Asymmetric jumping: A typically developing child does not show side preference until preschool age. If you notice your child always pushing off and landing with one side, drags one leg or holds it stiffly, or if one side is not helping in the initiation of jumping, there is probably an underlying cause, such as weakness or pain.

No power during push-off: If your child prepares to jump by initiating a squat but then her feet barely leave the floor, her leg muscles may not be strong enough yet to fully propel her weight forwards or upwards.  He or she might have trouble planning how to initiate and complete the jump.

Frequent falls: If your child crumbles to the floor or if their knees buckle every time they land from a jump, or if your child falls on purpose when trying to jump, it could be a sign that there is an underlying impairment that is impacting ability to maintain balance during jumping.

Increased anxiety or behavioral resistance to the task: Does your child hesitate, ask to be picked up, or ask for a hand any time he or she is  encouraged to jump down or over something on the ground? Do they throw a tantrum or flop to the ground if you don’t help?  These are signs that indicate jumping is scary or too hard for them.

Check out Gross Motor Milestones: Stairs to learn what your child should develop next. If you have concerns regarding your child’s gross motor skills, contact MOSAIC Health & Rehab for additional suggestions or for a free screen. To learn more, check out this great milestone moments list from the CDC.

Helping Hands In Haiti

Haiti 1

In March, Tia Pester, one of MOSAIC’s physical therapists, went on a medical mission trip to Haiti. Haiti is the poorest country in the western hemisphere. Following the earthquake in 2010, access to routine medical care and clean drinking water became even more limited. As a whole, the country suffers from poor nutrition and lack of access to medical care. Consequently, the average life expectancy in Haiti is only 50 years of age.

The medical team Tia traveled with consisted of forty-one physicians, nurse practitioners and pharmacists. Physical therapists, dentists, medical and dental students, and various other support staff also traveled to Haiti.

More Than a Mission Trip

They provided the locals with a multitude of free services. These included primary care, physical therapy and vestibular rehab,  as well as, tooth extractions, eye exams and glasses. Access to pharmaceuticals were also provided. Each team member was responsible for supplying all of their own equipment. Local physical therapy clinics and patients donated assistive devices, shoes, glasses, braces, and slings to help cover those needs.

While in Haiti, the medical team treated 1,368 patients in just four days! These clinics were set up in the cities of Canaan and Jerusalem. These cities are near the capital of Port-au-Prince. An additional clinic was set up for the families and the staff of the guest house where the group stayed for the week.

Global Health Outreach, which is part of Christian Medical and Dental Associations, is a national organization.  They run medical mission trips to numerous countries including areas of Africa, Central and South America, and the Middle East. Tia plans to continue to participate in medical mission trips in the future. Consequently, if you have any extra braces, canes, or equipment that you no longer need, don’t throw it away! Drop it off at MOSAIC Rehabilitation and we will donate it towards Tia’s next adventure, wherever that may be.

“What’s Going On In There?”  Oral Motor Skill Development

When Oral Motor Skills Develop

Did you know a baby’s basic oral motor skills develop in the third month of pregnancy? These skills include sucking and swallowing.  Development of these skills will help a baby move from liquids (milk or formula) to solid food.  Additionally, speech development requires oral motor movements of the jaw, lips, tongue, soft palate, and cheeks. This is important from when baby first starts cooing to children formulating complex words. What if your baby is having trouble with milk leaking from their mouth while nursing? What if your 12 month old is not chewing, and swallows everything whole? These may be signs that their oral motor skills are not functioning as well as they could be. Therefore, oral motor therapy may be beneficial.

Oral Motor Therapy…What’s That?

You may be wondering, what exactly is oral motor therapy?  The Beckman Oral Motor Program is an evidenced based form of oral motor therapy. This means that clinical research has proven that this program is effective. What is unique to the Beckman Oral Motor approach is that it targets specific areas to increase range of motion, strength, and function of very specific muscles.

The targeted exercises provide movement to make the muscles contract against resistance to build strength. The exercises help to increase muscle control, strength, and range of motion for the jaw, lips, cheeks, and tongue. But the key part to this program is that the therapy techniques do not require the  person to participate, so the treatment can be used from birth to older individuals and still benefit.   

How Could This Affect My Child?

As an example, you notice that your newborn is having difficulty nursing or taking a bottle and that a lot of milk is spilling out the side of her mouth. You are told she has an upper lip tie. In order to increase her range of motion and obtain a good seal when nursing or taking a bottle, clipping the upper lip tie may be recommended. However, this may not be necessary. Working with specific exercises to increase the range of motion or strength of the lips may greatly impact her ability to nurse or bottle feed. A referral to a trained  therapist may be beneficial before moving ahead with surgery.

Another example is a baby being seen by a physical therapist for torticollis (in layman’s terms your baby prefers to turn their head to one side over the other). Often, babies with torticollis have tightness or weakness with their oral motor skills.

This therapy can also be used with anybody that has difficulty eating and/or with tolerating different types of textures and foods. All speech-language pathologists and occupational therapists at MOSAIC Rehabilitation are trained in the   Beckman Oral Motor Protocol. We also have two certified   lactation counselors on staff if you are having trouble breastfeeding or have general questions. If you have concerns about your child’s oral motor development, or someone has recommended your child have a tongue or lip tie clipped, please call us for a free screen (406) 388-4988.


Babywearing

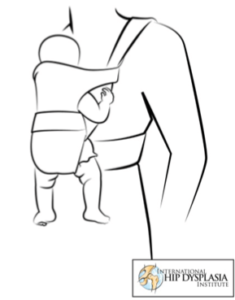
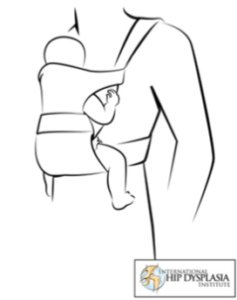
What is Babywearing?

Babywearing is the practice of keeping your baby close to you while utilizing one of the many baby carriers that are available to buy. There are many benefits to babywearing including bonding with family and caregivers, ease of skin-to-skin contact (which can aid in breastfeeding), good alignment of developing joints, it keeps babies off of their backs and thus decreases uneven pressure on their heads, and allows hands-free positioning in order to complete other tasks while still carrying their babies. It has also decreases the incidence of postpartum depression and can be helpful to parents of babies with special or high needs.  Additionally, carried babies sleep, feed, and grow better.  They are also happier. According to one study, carried 6-week old babies cried 43% less than other babies.

The Proper Way to Wear Your Baby

When discussing the proper way to wear a baby, it is important to address proper alignment. Infants spend their time in the womb in a fetal position. So, it is important that they maintain a similar position while in a carrier until their hip joints finish developing. The International Hip Dysplasia Institute states, “The healthiest position for the hips is for the hips to fall or spread (naturally) apart to the side, with the thighs supported and the hips and knees bent. This position has been called the straddle position, jockey position, frog position, human position or spread-squat position. Free movement of the hips without forcing them together promotes natural hip development.”

What to Consider Before Buying a Carrier

Incorrect
Correct

There are a few different types of carriers with no type being better than the other.  Usually one type will fit a mom or dad better or be more comfortable.  There are also carriers that are more appropriate for the baby’s stage of development.  The most important thing to note is the alignment of the baby once in the carrier and how well it feels to the caregiver using it (allowing for good support at the shoulders and back).

Babywearing Resources

There are many resources if you want more information about babywearing.  A group called Babywearers of Bozeman is a local resource. This group helps moms and dads navigate all the different types of carriers and can help you find what will work best for the family. They will help fit them, show parents how to do different holds, and educate on safety. They will also rent a carrier for a month and see if it is the right carrier for them before making a purchase.

Additional information can be found at birthplacebozeman.com/baby-wearers.html or on Facebook at www.facebook.com/bwbozeman. You can also find a wealth of  information online. Here are some very reliable sources that offer great info for people who want to learn more:

  • www.babywearinginternational.org
  • www.askdrsears.com
  • www.lalecheleague.org/nb/nbnovdec04p204.html
  • www.healthychildren.org


Gross Motor Milestone Series: Walking

Prior to walking, your child should be able to pull to stand and lower to the floor independently without falling. He or she should be able to pick toys up off the floor and return to stand while holding onto a support surface and continue playing in supported standing indefinitely. Again, in order to move, your baby has to have the freedom to move. This means daily time spent on the floor outside of car seats, strollers, standers, swings, etc.

Cruising

Cruising activities help to build leg and lower back strength while working on balance.

  • While standing and holding onto a piece of furniture, place a toy just out of the reach of your child and encourage them to go get the toy. To start, move the hands and feet one at a time in the direction of the toy. Practice going to both the right and the left. Gradually increase the distance your child has to cruise to reach the toy.
  • Practice rolling a toy car along a low surface while walking.
  • Work on cruising around corners to the right and the left.
  • Practice walking sideways left and right while holding onto both of your child’s hands or while your child is holding onto a slowly moving toy, such as the side of a wagon.
  • Progress to cruising at taller surfaces or by using a flat wall.

Standing

Independent standing demonstrates a child’s ability to keep their balance without support and shows adequate strength to maintain upright posture.

  • Have your child stand while lightly holding on to their hands. Slowly release the support of one hand and practice maintaining balance. Start having your child reach for toys with the unsupported hand. Gradually decrease to one finger assist only.
  • Complete the activities above with your child standing at a support surface.
  • Have your child stand with his or her back against a couch or wall and reach for or play with toys.

Have your child stand on a stable floor and slowly release your support. Make sure that their feet are about shoulder width apart and that they are not leaning to one side or falling forward or falling backward you release your support. Be ready to catch them before they fall.      

Walking

Walking is a lifelong motor skill that we use to access our environment, for recreation, and for exercise. It is a required prerequisite for advanced balance and coordination activities, such as running and jumping.

  • Start practicing step taking while holding your child around the waist. Assist with weight shifting by leaning slightly to the side so that it is easier to un-weight the opposite foot and move it forward.
  • Progress to holding onto both arms, then both hands, then one hand. Practice stepping on bubbles, bug stickers, etc.
  • Have your child walk while holding onto a push toy. Weight the toy down to make it heavier so that it doesn’t get pushed too far in front.
  • Hold a hula hoop or dowel and have your child walk while holding onto the other end.
  • To progress independent steps, place toys on two support surfaces (such as a couch and a coffee table) so that your child has to move between the two to get their toy.
    •  To start, the support surfaces should be close enough together that no steps are needed but far enough away that they can’t touch both sides at the same time.
    • Once your child is able to move easily between the two surfaces, gradually increase the distance between them until steps are required to get from one side to the other.

Once your child starts walking more than 5-10 steps, work on these activities:

  • Walk to a toy, pick it up off the floor, and continue walking.
  • Carry items of varying sizes from place to place.
  • Walk around obstacles.
  • Change directions. Start with small turns and work up to 180° turns.
  • Walk over varying surfaces – hardwood, tile, carpet, grass, dirt, sand, etc.

If your baby isn’t walking alone by 16 months of age, they might benefit from a physical therapy evaluation. Contact MOSAIC Health & Rehab to schedule a free screen or to set up an evaluation. Check out Gross Motor Milestones: Jumping to learn what your child should develop next. To learn more, check out this great milestone moments list from the CDC.  

Tongue Thrust and Speech Development

Picture1Tongue thrust is a swallowing pattern in which the tongue pushes against or between the teeth.  Accordingly, this type of swallow  pattern is also referred to as oral myofunctional disorder or infantile swallow pattern.

The most visible characteristic is tongue protrusion during the swallow and at rest. There are other muscles that function incorrectly but are not easily seen. The incorrect resting position of the lips, tongue and jaw impact both swallowing and speech sound production. Additionally, parents frequently report issues with breast or bottle feeding from birth or express concern that their child has a lisp.

Tongue Thrust Eating Pattern

Characteristics of tongue thrust eating pattern:

  • A lack of facial muscle usage or tensing of facial muscles
  • Food particulates through-out the oral cavity after the swallow
  • Incorrect tongue seal against or through the teeth
  • Molars not making contact during the swallow
  • A suckling pattern with cup or straw drinking

Common Behaviors

There are behaviors/etiologies that frequently occur with a tongue thrust.  It is necessary to address these behaviors early in treatment. If behaviors are not addressed, it is likely progress will be impeded. Behavoirs include:

  • Sucking habits; primarily thumb, finger, and extended pacifier sucking
  • Open lip posture
  • Mouth breathing
  • Enlarged tonsils/adenoids
  • Lip or tongue weakness
  • Miss aligned teeth
  • Allergies

Does My Child Need Treatment For Tongue Thrust?

Firstly, treatment focuses on obtaining normal action of muscle groups related to tongue movement and swallowing. This includes identification and elimination of unwanted oral behaviors, exercises specific to the patient, correcting resting tongue position, and teaching a correct swallow. In addition, a home-based program is a necessary part of treatment. In order to see success, the program must be completed several times per week (preferably daily).

The consequences of not correcting a tongue thrust pattern include:

  • Speech problems
  • Dental/orthodontic issues
  • Appearance issues (open mouth posture, tongue protrusion, drooling)
  • Lowered self-esteem due to poor eating habits (poor table manners/messy eating, taking extensive time to finish a meal, teasing by peers).
  • Nutritional issues and health issues (limited food selection, poorly chewed food, digestive disturbances)
  • Difficulty with oral transit leading to choking, aspiration

A child with incorrect speech sounds due to a tongue thrust will not correct error sounds without eliminating the tongue thrust pattern. For that reason, a speech-language pathologist can complete an assessment to determine if a tongue thrust is causing current sound errors or may cause future speech errors.  Treatment to correct tongue position and movement can then be initiated to correct sound errors and/or prevent future speech difficulty.