 Cesarean sections, or C-sections, are one of the most common surgeries performed. Twenty two percent of women in the United States have undergone one. Some C-sections are planned and scheduled, and some are performed due to complications that occur during labor. A C-section is a major abdominal surgery. Yet, most women do not receive any education or support when it comes to recovering from this surgery. I am here to encourage women who are in their childbearing years (or even after!) to see a pelvic floor physical therapist after giving birth, whether C-section or vaginal. It is common to see a physical therapist after knee replacements, hip replacements, ACL repairs, etc. So let’s make it common to see a physical therapist after a C-section!
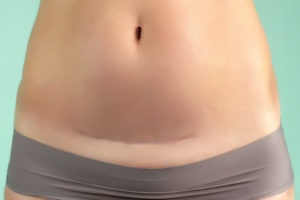
Having a baby is hard on your stomach muscles. During pregnancy, your abdominal muscles have been over stretched and strained. Then, your abdominal muscles are cut during a C-section in order to safely remove your baby. Some common symptoms that can occur after having a C-section include:
- Back pain
- Bowel and bladder dysfunction
- Scar tissue/adhesions
- Scar pain/sensitivity
How can physical therapy help after Cesarean sections?
Depending on your symptoms, your pelvic PT will assess your posture, low back, hips, your abdominal wall (including your scar), and pelvic floor. If you are reading this and are 6 months postpartum or 6 years postpartum, it is NEVER too late to start working on your C-section scar! During your plan, your physical therapist will teach you scar massage to improve the healing of the scar and reduce any pain and sensitivity that may occur. They can help rehabilitate your core muscles to improve strength and coordination. Your core consists of your abdominals AND your pelvic floor, diaphragm, and deep back muscles called multifidi. All those muscles need to work together for a happy core!
A recent study shows that those who participate in physical therapy after giving birth post Cesarean sections had improved outcomes. This includes less pain, better satisfaction, and improved confidence with exercise ability. If you haven’t worked with a physical therapist since giving birth, now is the time to schedule your evaluation. There is so much we can do to help! And, check out Kegels are Not the Answer for Everything to learn more about pelvic floor physical therapy.
Reference
-
Stone, Jennifer DPT, OCS, PHC1; Skibiski, Katie DPT, PHC1; Hwang, Sarah MD2; Barnes, Courtney MPH, MD, FACOG1 Physical Therapy in Addition to Standard of Care Improves Patient Satisfaction and Recovery Post-cesarean Section, Journal of Women’s Health Physical Therapy: January/March 2021 – Volume 45 – Issue 1 – p 10-19 doi: 10.1097/JWH.0000000000000187
 What is working memory and how does it relate to language? Working memory refers to the brain’s process of storing information, then recalling the information later on to complete tasks. It’s a storage system used for tasks of daily living, including engaging in conversation, following instructions, and solving problems. For example, if you ask your child “what’s 2+2?” Your child uses working memory to process the question, implement a previously learned skill to execute the calculation, then respond. Working memory is often confused with short term memory. Working memory involves the process of storing, organizing, and manipulating information for use later on. Short term memory involves temporary storage of information.
 Like any profession, you have to start somewhere. Starting out as a “new” anything is always challenging and so exhausting mentally. The transition from title of “student” to “new grad practitioner” poses many challenges related to the actual work, as well as adjusting to new changes in your personal schedule as well. Being a new graduate has had an interesting spin in 2020 with ever changing schedules and all the uncertainty surrounding COVID-19. Put that on top of a new grad, and you have a recipe for extra naps in your day. Here are some ideas, tips, and resources for new graduates that may help with the difficult transition. At the bottom of this blog, hear some bonus words of wisdom through interviews from fellow new grad pediatric and adult practitioners across Montana.
 The first part in the postnatal return to running series after childbirth will address signs and symptoms of pelvic floor and/or abdominal wall dysfunction as well as risk factors. One question that frequently gets asked is, “When can I start running after giving birth?” Some women can’t fathom running soon after birth and some go in way too quickly! Running is a high impact sport that places a lot of demand on the body. High impact exercise was found to have a 4.59 fold increased risk of pelvic floor dysfunction compared to low impact exercise. After birth, women need adequate time to heal and regain strength, specifically with abdominal and pelvic floor muscles. This includes women who had vaginal births and caesarean section deliveries!
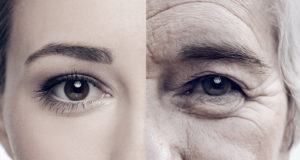 Voice is one aspect of communication. The sound of our voice is also something with which we identify strongly. It is uniquely us. But like the rest of our body, our voice changes with normal aging.