Prepping for Pumping: Supporting the Return to Work

Returning to work is a huge transition for many mothers. The addition of pumping can be both emotionally and physically challenging. Will baby take a bottle? What will my boss think? Will I lose my supply? If any of this sounds familiar, you’re not alone! Everyone’s experience will be different, but as Speech Language Pathologists and Certified Lactation Counselors, here are some of the steps our feeding specialists suggest. These will help you ease your way back to work feeling more confident and less anxious.

Firstly, know your rights. As of 2010, portions of the Affordable Care Act require employers to provide you reasonable breaks and a private space to pump. Legally, this cannot just be a bathroom. You may take these breaks multiple times throughout your shift until your baby is one year old (though many employers are accommodating beyond this).

Then, be upfront with your boss. If you know you’ll be pumping, consider starting this conversation as part of your maternity leave meeting. That way, there’s already a plan in place and less suspense for your return. Let them know how often you’d like to take a break, how long you feel is appropriate, and where you’d like to store your milk. Remember to discuss any sanitizing or washing needs. Don’t sell yourself short – 15 minutes is often not long enough to set up, express milk, and tidy. Similarly, trying to please your boss by pumping less often will likely reduce your milk supply. Be upfront and honest.

Pumping Logistics

Now let’s get to logistics. You’ll need an appropriate pump for expressing milk at work to be effective in supporting your goals. Most insurance providers cover electric pumps at little to no cost. While hands free models are hitting the market hard, proceed with caution until you feel confident in your typical supply. Often, these types of pumps are less powerful and yield lower milk output. Additionally, get to know your flange size. Most woman are using a flange much too large, which can cause pain, reduced milk flow, and be less efficient for pumping. Pumps can be confusing and frustrating. A lactation provider will be able to support you in selecting a pump that fits your needs, budget, and preferences.

You’ll also want to make a schedule. If your infant is nursing at home every 2-3 hours, consider pump breaks at similar intervals to make up for those missed feeds. Later on in your back-to-work journey, you may be able to space these out further. But we want to do everything we can to protect your supply in those first precious weeks or months. What might that look like?

What Does a Pumping Schedule Look Like?

Let’s say Sarah works 9 am to 4 pm. She nurses her 4 month old daughter, Hattie, at 8 am before they leave the house for daycare drop off. Sarah pumps for 25 minutes at 11 am, again at 1 pm for 30 minutes, then leaves work at 4 pm and nurses Hattie when they arrive home at 4:15pm. A standard recommendation would be to send about 1 to 1.5 oz of milk per hour that you are gone. So, Sarah sends Hattie to daycare with two 4 oz bottles. Now, clearly, many babies do not run by this specific of a timetable. But as you practice and get in the rhythm of pumping, your childcare days become more predictable.

Storage guidelines

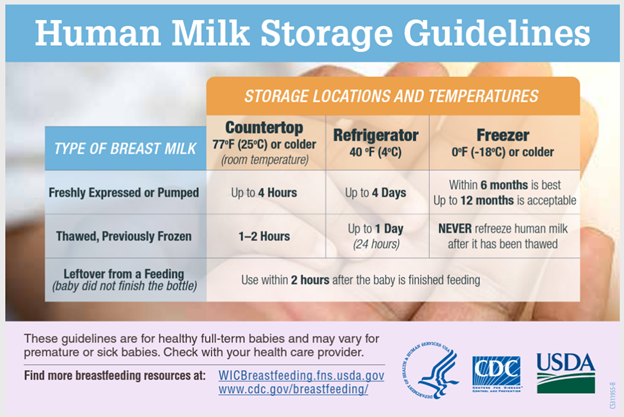
It’s always important to remember appropriate storage guidelines. A quick review per the CDC:

  • Freshly pumped milk is safe at room temperature for up to 4 hours, in the refrigerator up to 4 days, and frozen up to 6 months (up to 12 months in a chest freezer).
  • Thawed, previously frozen milk is safe at room temperature for up to 2 hours, in the refrigerator for 1 day, and should never be refrozen.

Finally, introduce and practice with a bottle early. Give yourself time to find baby’s preferences before your first day back. If you’re still having difficulty, schedule a consult with a feeding specialist, or check out Help! My Baby Won’t Take a Bottle.

Going back to work can be hard, but our community is here to help! Lactation consultations are great tools to establish a plan of action. We’re here to support you all along the way. Best of luck and congratulations.

Resources

Study Tips for Students with Language Learning Disorders

Studying and homework are not preferred activities for any student. However, they are skills students need to learn in their early school years. This is especially important for students with language learning disorder or dyslexia. The following study tips will make studying easier and more effective.

Study tips

  • Firstly, know what the test will look like. Will the test be true/false questions, multiple choice questions, short answer, or essay? The test format will determine how much reading and writing is needed. An essay will certainly require much more writing and recall of information than, for example, a multiple choice question.
  • Allow extra time. Do not wait to study the night before an exam. Instead, begin studying on a Monday for a Friday exam. A student who reads more slowly than typical will require extra time to cover test material. Extra time may also be needed because a student requires a great deal of repetition to recall facts, dates, definitions, etc. Spaced repetition strategy is an effective means to facilitate recall of such information. The idea is to space out short study sessions focusing on one topic and progressively increasing the time before recalling information. For example, read a definition, restate the definition immediately, then at one minute, five minutes, 10 minutes, etc.
  • Establish a study schedule to review course work frequently. A night without homework should not be a night without homework. Use non-homework days to review concepts used in school, especially if a subject is difficult. Review can be a few minutes studying math facts, spelling words, or definitions. Break material down into smaller chunks and review frequently using spaced repetition.
  • Get study material in advance. Most teachers have their lessons planned in advance and are happy to make study material available to students. This is a good time to practice self-advocacy.

Make it Easier

  • Make flashcards. Flashcards break material down in to smaller units, making information more easily accessible. This is more effective than reading an entire paragraph over and over again. Make flashcards while reading. This is faster and more accurate than trying to make the cards after reading an entire paragraph.
  • Ask parents to help with reading. The purpose of studying is to learn the information, not necessarily to improve your reading. Improving reading is a good goal, but not at this time. The focus is to understand and acquire the knowledge needed to do well on a test.
  • Remove distractions. Make the area as study friendly as possible by having needed materials available so that there is no temptation to get up and get something every few minutes. Have a snack before beginning and certainly turn off your cell phone and place it out of sight.

Studying is not enjoyable but is an essential skill for academic success. The idea is to study smarter, not longer, by using study techniques and studying regularly.

Vision for Preschoolers

From the ages 2 to 5 children will be fine tuning the visual abilities gained during infancy. They will also be developing new ones. Preschoolers use their vision to guide learning experiences. Basically, every experience provides an opportunity for growth and development. Play activities of stacking blocks, ball play, coloring, drawing, and assembling lock together toys are helping to develop visual skills. They address eye-hand body coordination, fine motor skills, and visual perceptual abilities which are foundation skills of reading and writing.

Ensuring preschoolers’ vision is developing normally will help provide a good “head start” as they enter school. Parents and caregivers need to be alert for the presence of vision problems during these preschool years. Well child checks typically include a vision screening by the child’s doctor/pediatrician. However, these screenings are limited and can miss vision problems. As a result, “passing” a vision screening can provide a false sense of security. They may not assess how well a child can focus or how well their eyes work together.

It is recommended that between the ages of 3 and 5 children have a thorough optometric eye examination to be sure vision if developing properly. With today’s equipment, a child does not need to know letters or how to read to have their eyes examined.

As parents and caregivers, the playtime that is spent with your preschooler can help to develop vision. Below is a very basic, simple list of activities that can be done to help develop visual skills.

Simple Activities that Develop Visual Skills

  • Throwing and catching bean bags or balls
  • Reading aloud and letting the child see what you are reading
  • Drawing and coloring using chalk, finger paints, and crayons
  • Block play and puzzles
  • Simple memory and matching games
  • Outdoor activities including swinging, spinning, and rolling

Preschool aged children generally will not verbalize complaints about their eyes. Therefore, the list below includes some things to watch for that may indicate a vision problem.

vision problems in Preschoolers: Warning signs

  • Sitting close to the TV or getting close to books/drawing activities
  • Squinting
  • Tilting their head
  • Covering an eye
  • Frequently rubbing their eyes
  • Short attention span for the child’s age
  • Turning of an eye in or out
  • Sensitivity to light
  • Difficulty with age level eye hand coordination tasks
  • Avoiding age level activities of puzzles, coloring, or other detailed activities

Despite being aware of what to look for and providing vision rich activities, children may still miss a step in vision development. A comprehensive visual examination between the ages of 3 and 5 is important to detect and address any concerns before the child begins school. You can also learn more about vision for younger kids and babies here. For more information regarding vision, check out these eye health tips.

Don’t Keep an Injury Secret

Hidden injuries cause pain in more places than sport. Physical therapists are experts in dealing with injuries, but your PT can’t help if they don’t know about your injury! You might be wondering who would keep an injury secret. The answer is – lots of people!

The first thing that comes to your mind might be an athlete, like a football player, or a baseball pitcher. But athletes aren’t the only ones that keep injury secrets. Performers like dancers keep injury secrets, and so do workers in all types of jobs. These groups might seem diverse. However, they have a lot in common when we look at the reasons they hide injuries.

So, why would anyone want to keep their injury secret instead of getting it treated and letting it heal?

Injury Secret #1 Reason: Stigma

Stigma is the first reason people hide injuries. Although there have been big improvements in the culture around sports, performing arts, and worker’s comp, some people still have the old “no pain, no gain” attitude. To some people, reporting an injury is an act of weakness, or a way of letting the team down.

In addition to this internal pressure, there can also be external pressure from coaches, parents, teammates, supervisors, or fans to keep playing or working.

Reason #2: Fear of Loss

Secondly, people hide injuries because they’re afraid of what they’ll lose. With the focus on head injuries in recent years, athletes know if they report concussion symptoms, they’re coming out of the game. Workers who get hurt on the job fear loss of pay, or loss of their job. Performers who get hurt might fear that their replacement will outshine them on the stage and take their place.

Injury Secret #3: Competitive Advantage

While the first two reasons apply to athletes, performers, workers and most any other group that might be hiding an injury, this one only applies to athletes. There is a third incentive to not report an injury – competitive advantage. If an opposing team knows a player has an injury, and what the injury is, they might be able to take advantage of it. For example, if a football team has a running quarterback that has an ankle injury, it will change how the opposing defense plays. 

These reasons all make some sense, but they’re also all shortsighted. Finishing a game, dancing tomorrow night, or working one more shift are never worth your long term health. Hiding a minor injury can turn it into a major one. It’s never weak to report an injury and you’re not letting your teammates, or coworkers down. If you’re not up to your best, you owe it to the people counting on you to let them know. Letting a healthy player, performer, or worker take your place is the right thing to do. If have an injury, don’t hide it! Just like your physical therapist can’t do your exercises for you, they can’t help if you don’t tell them what the problem is. Let the right people know, then go to the right person for help – your physical therapist!

What is Bilateral Coordination?

Did you know that bilateral coordination is closely related to the vestibular system? When our body registers movement and gravity, our vestibular system allows us to respond with appropriate movement, balance, and posture.

In fact, there are three components:

  • Symmetrical movements
  • Alternating movements
  • Dominant hand/supporting hand movements

The vestibular system, and our body’s ability to register information and integrate it into movements, enables bilateral coordination and body awareness of the upper and lower body. Below is a list of activities that can help build and develop bilateral coordination. Try these activities to work on skills like visual motor integration and fine motor while encouraging bilateral coordination.

Symmetrical Movements

With symmetrical movements, both hands do the same thing at the same time. For example, using both hands to pull up pants or socks. Other activities that can work on this skill include:   

  • Holding a squeeze bottle with both hands at midline to paint
  • Jumping rope and jumping jacks
  • Catching a ball with two hands

Alternating Movement Bilateral Coordination

With alternating movements, both extremities are working, using alternating motions. So, you will see alternating coordination with swimming or climbing a ladder. Activities to work on this skill include:

  • Riding a bike
  • Marching

Dominant Hand/Non Dominant Hand

With dominant hand/non dominant hand, one hand performs a task while the other hand assists. This is needed for many fine motor skills. Therefore, this type of coordination is needed for writing and cutting with scissors. Activities to work on this skill include:

  • Lacing cards
  • Coloring
  • Writing
  • Tying shoes

So, try some of these activities to help your kids improve their bilateral coordination. Also, if you have a baby, check out these tips for crawling and start working on it early!

Lewy Body Disease

Lewy body disease is a progressive neurological disorder primarily affecting thinking, memory movement, mood and sleep. The disease is caused by protein deposits called Lewy bodies in the brain. It is one of the most common causes of dementia and affects more than one million people in the United States. Lewy body disease has some very specific symptoms.

  • Cognitive symptoms of LBD include visual hallucinations, loss of concentration, attention, and wakefulness, difficulty problem solving and loss of memory.
  • Movement problems are also associated with the disease and may include rigid movements, tremor, and shuffling resulting in falls.
  • Sleep difficulty is common and may cause acting out of dreams by punching, yelling, kicking and screaming.
  • Mood changes occur and may include depression and apathy.

Unfortunately, there is no cure for Lewy body disease. Some medications may help but side effects of the medication may lessen their benefit. Lewy Body dementia is devastating to both the patient and family. Having a plan to manage the symptoms will allow both the patient and primary caregiver to live life as fully as possible. Use the following tips as a guide.

Tips for Living with Lewy Body Dementia

  1. Educate the patient. Knowing what to expect reduces anxiety surrounding the disease, increases safety and allows planning for the future, both for you and loved ones. Obtain and carry a LBD Medical Alert Wallet Card to advise others of cognitive or mobility problems if and when you are unable to do so.
  2. Educate the caregiver. Caring for someone with dementia can be challenging. The better caregivers understand the symptoms and progression of the disease, the better they will be able to predict and manage the behaviors and struggles associated with the disease. It will also help loved ones accept changes in behavior while knowing when to seek professional help.
  3. Focus on the good days. Unlike other forms of dementia, symptoms of Lewy Body dementia vary day to day. Plan for a good day but accept that a bad day may happen and tomorrow is another day.
  4. Take care of the caregiver. A caregiver running on empty will not benefit either the patient or the caregiver. It is not possible to effectively provide care 24/7. Reach out to family or agencies in your community to get respite.
  5. Emphasize the remaining abilities. Because LBD is a progressive disease, skills will decline over time. Instead of focusing on lost skills, look for abilities that remain. Take a shorter walk, plant a flower pot instead of a garden, look and talk about previously completed DIY projects rather than start one.
  6. Choose your battles. Hallucination and delusions are challenging symptoms of LBD. Arguing about their presence is not effective as they appear very real to the patient. Addressing the fear is often more effective.
  7. Be intentional about scheduling. Make a list of things you and your loved one may enjoy. Choose one to do each day but be flexible in the event of a bad day precludes doing the activity. Focus on quality of activity, not quantity.
  8. Physical exercise. Physical exercise has been shown to slow down the progression of dementia. It builds strength and lessens the risk of falling. It also improves mood for the patient and caregiver.